# LnMe - your friendly ⚡ payment page
LnMe is a personal Bitcoin Lightning payment page/widget and self-hosted [Lightning Address](https://lightningaddress.com/) server.
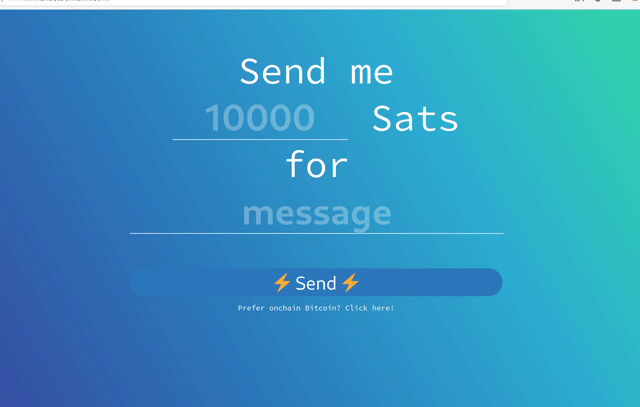
**See it in action: [ln.michaelbumann.com](https://ln.michaelbumann.com/) - my lightning address: bumi@ln.michaelbumann.com**
LnMe focusses on simplicity and ease of deployment. It connects to an existing lightning node (currently LND is supported).
LnMe is one [simple executable](https://github.com/bumi/lnme/releases) file that can be deployed anywhere with no dependencies. (on your own node or for example with [one click on Heroku](#heroku))
## Installation
LnMe connects to your [LND node](https://github.com/lightningnetwork/lnd/blob/master/docs/INSTALL.md), so a running LND node is required.
LnMe can easily run next to LND on the same system or any other hosting provider.
1. Download the latest [release](https://github.com/bumi/lnme/releases)
2. Run `lnme`
3. Done.
### Build from source
1. `$ git clone https://github.com/bumi/lnme.git && cd lnme`
2. `$ go install`
3. `$ rice embed-go && go build`
4. `$ ./lnme`
Note: You must have [go.rice installed](https://github.com/GeertJohan/go.rice#installation)
### Configuration
#### LND configuration
To connect to the lnd node the cert, macaroon and address of the lnd node has to be configured. LnMe uses the LND defaults.
* `lnd-address`: Host and port of the LND gRPC service. default: localhost:10009
* `lnd-cert-path`: Path to the LND TLS cert file. default: ~/.lnd/tls.cert
* `lnd-macaroon-path`: Path to the LND macaroon file. default: ~/.lnd/data/chain/bitcoin/mainnet/invoice.macaroon (invoice.macaroon is recommended)
Instead of the path to the macaroon and cert files you can also provide the hex strings:
* `lnd-cert`: LND TLS cert as HEX string.
* `lnd-macaroon`: LND macaroon HEX string. (invoice.macaroon is recommended)
#### Other configuration
* `static-path`: Path to a folder that you want to serve with LnMe (e.g. /home/bitcoin/lnme/website). Use this if you want to customize your ⚡website. default: disabled
* `disable-website`: Disable the default LnMe website. Disable the website if you only want to embed the LnMe widget on your existing website.
* `disable-cors`: Disable CORS headers. (default: false)
* `disable-ln-address`: Disable [Lightning Address](https://lightningaddress.com/) handling.
* `port`: Port to listen on. (default: 1323)
* `request-limit`: Limit the allowed requests per second. (default: 5)
Depending on your deployment needs LnMe can be configured using the following options:
1. Command line flags
2. Environment variables
3. Config TOML file
#### Examples:
##### Command line flags:
$ lnme --help
$ lnme --lnd-address=lndhost.com:10009 --port=4711
$ lnme --disable-website
##### TOML config file
See [config.toml.example](./toml.config.example) for an example file.
$ lnme --config=/path/to/config.toml
##### Environment variables
All environment variables must be prefixed by `LNME_` use `_` instead of `-`
$ LNME_LND_ADDRESS=127.0.0.1:10005 lnme
### LND Permissions
LnMe needs the following LND permissions:
* Read/Write permission for invoices
* Write permission for onchain address (if you want to use the onchain option)
Use the LND [macaroon bakery](http://macaroon-bakery.freedomnode.com/) to create a new macaroon for LnMe.
To get the HEX versions of the files use `xxd -plain` e.g. `xxd -plain invoice.macaroon | tr -d '\n'`
### Deployment
It is the easiest to run LnMe on the same node as LND. But you can run it anywhere as long as your LND node is accessible.
#### Heroku
One click deployment with Heroku:
You will need your LND address, the LND tls certificate (HEX) and the macaroon (HEX).
[](https://heroku.com/deploy?template=https://github.com/bumi/lnme)
Here is a [Video Demo of the Heroku deployment](https://www.youtube.com/watch?v=hSFXhnLp_Rc)
#### Notes
To run LnMe as systemd service have a look at the [systemd service example config](https://github.com/bumi/lnme/blob/master/examples/lnme.service)
I am running LnMe behind a reverse proxy using [caddy](https://caddyserver.com/) which comes with [fully-managed HTTPS](https://caddyserver.com/docs/quick-starts/https) via [letsencrypt](https://letsencrypt.org/).
Example Caddyfile:
```
lnme.michaelbumann.com {
reverse_proxy 127.0.0.1:1323
}
```
`$ caddy --config /etc/caddy/Caddyfile`
### Lightning Address
The Lightning Address is an Internet Identifier that allows anyone to send you Bitcoin over the Lightning Network.
Lightning Address builds on [LNURL-pay](https://github.com/fiatjaf/lnurl-rfc/blob/luds/06.md) LnMe handles the necessary requests for you.
For more information check out the website: [lightningaddress.com](https://lightningaddress.com/)
Your Lightning Address: `{anything}@{your domain}`
### Customize your ⚡ website
LnMe comes with a default website but you can easily configure and build your own using the the LnMe JavaScript widget or JSON API.
Take a look at the [embedded default website](https://github.com/bumi/lnme/blob/master/files/root/index.html) for an example and use the `--static-path` option to configure LnMe to serve your static file.
1. Create a new folder (e.g. /home/satoshi/my-ln-page)
2. Create your index.html
3. Run lnme: `lnme --static-path=/home/satoshi/my-ln-page
### JavaScript Widget integration
You can integrate the LnMe widget in your existing website.
#### 1. Add the LnMe JavaScript files
```html
```
#### 2. Usage
To request a lightning payment simply call `request()` on a `new LnMe({value: value, memo: memo})`:
```js
var lnme = new LnMe({ value: 1000, memo: 'high5' });
lnme.request();
```
Use it from a plain HTML link:
```html
Tip me
```
##### More advanced JS API:
```js
let lnme = new LnMe({ value: 1000, memo: 'high5' });
// get a new invoice and watch for a payment
// promise resolves if the invoice is settled
lnme.requestPayment().then(invoice => {
alert('YAY, thanks!');
});
// create a new invoice
lnme.addInvoice().then(invoice => {
console.log(invoice.PaymentRequest)
});
// periodically watch if an invoice is settled
lnme.watchPayment().then(invoice => {
alert('YAY, thanks!');
});
```
## Motivation
I wanted a simple way for people to send Lightning payments using my own lightning node.
BTCPay Server is too big and hard to run for that and I do not need most of its features.
## Development
Use `go run` to ron the service locally:
$ go run lnme.go --address=127.0.0.1:10009 --cert=/home/bitcoin/lightning/tls.cert --macaroon=/home/bitcoin/lightning/invoice.macaroon
## Build
LnMe uses [go.rice](https://github.com/GeertJohan/go.rice) to embed assets (HTML, JS, and CSS files). run `rice embed-go` (needs to be [installed](https://github.com/GeertJohan/go.rice#installation))
$ rice embed-go
$ go build
## Contributing
Bug reports and pull requests are welcome on GitHub at https://github.com/bumi/lnme
## License
Available as open source under the terms of the [MIT License](http://opensource.org/licenses/MIT).